
By John C. Rucker (Page 6 of 8)
"What?" you might be saying about now, "Client configuration? I thought you said this wouldn't require any configuration on our patron laptops!" Well, that's true. But if you want to use this filter for your staff computers on the other side of the firewall, or for your wired public access computers, you'll need to adjust the appropriate settings. If you don't want to do either of these things, you can ignore this page and go on to the next section.
Note: All of these steps need to be performed while logged in to the user account that your staff or patrons will use. If you have multiple login accounts, like one for adult use and one for kids, you'll need to repeat the following steps for each account.
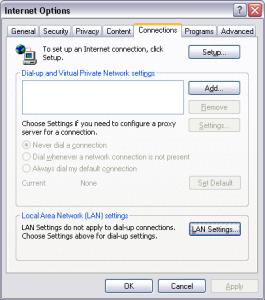
For Internet Explorer, click on Tools ->
Internet
Options then click on the
Connections tab. Then click on the
LAN Settings… button at the bottom.
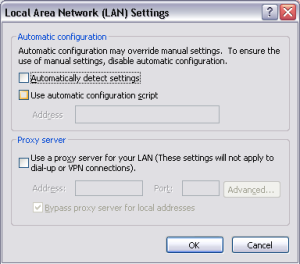
In the window that pops up, check the "Use a proxy server […]" then click the "Advanced" button.
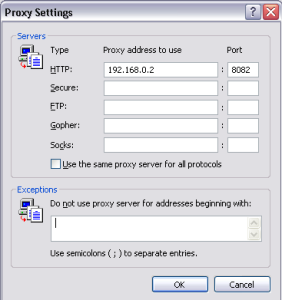
In the "Advanced" window, put the IP address of your
server in the "HTTP" field. In the "Port" field put
either 8081 for the children's profile or
8082 for the adult profile.
Given all of the security and web page display problems with Internet Explorer, you should have the Firefox browser on all your public computers, in addition to Internet Explorer. If you don't, well, shame on you! But you can skip all the steps below pertaining to Firefox if that is your case.
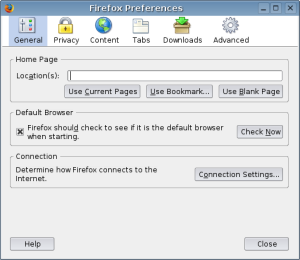
Setting up the filter for Firefox is even easier. Click
on Tools -> Options to display the
options
window, then click on the "Connection Settings" button.
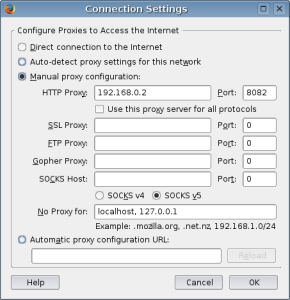
In the "Connection Settings" window, select "Manual
proxy configuration" and enter the address of your
server in the "HTTP Proxy" field. In the "Port" field
put either 8081 for the children's profile
or 8082 for the adult profile.
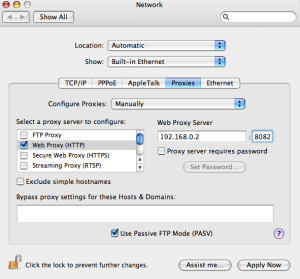
On the Macintosh, instructions for Firefox are the same
as above. For Safari, click on the Apple menu,
select "System Preferences" then select "Network". In
the "Network" window, select the appropriate network
adapter, then click on the "Proxies" tab. Check the
"Web Proxy(HTTP)" box, then enter the IP address of your
server in the "Web Proxy Server" field. In the "Port"
field put either 8081 for the children's
profile or 8082 for the adult profile.
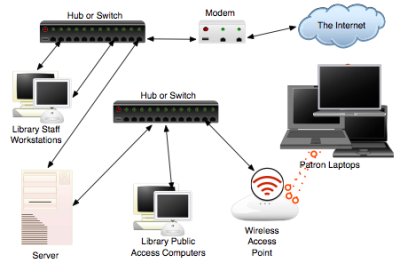
Revised Network Diagram
Now, here's a thought: what if you want to use this
filter not just for your staff and laptop wireless
service, but
for your public computers at the library, too. No
problem! Take a look at the revised network diagram at
left. We've added another switch or hub to connect the
wired public access computers to our web filter server.
You can follow the instructions above for your public
computers, only change the IP address to
192.168.1.1 (or whatever your IP address
is) since the computers will be
on the public side of the server.
Of course, one of the problems with using the proxy server settings we just discussed above is that anybody else with this knowledge can disable the filter as easily as you put it on. Fortunately, there are some ways to deal with this, too.

Group Policy Editor
Since—as you may have noticed from the screenshot
above—you can password-protect the proxy settings
on a Macintosh, we'll focus on the Windows platform.
With Windows 2000 and newer, you can use the Group
Policy Editor to prevent people from changing the proxy
settings in Internet Explorer, and you need to change
only one policy to do so. To start the editor, click
the Start Menu, then select "Run…". Type
gpedit.msc, then click OK, and the Group
Policy Editor window will appear. On the tree on the
left-hand side, navigate down to Local
Computer Policy -> User Configuration ->
Administrative Templates -> Windows Components ->
Internet Explorer,
then find the policy, "Disable changing proxy settings".
Double-click on this to edit it, enable the policy, then
click "OK". You can close the Group Policy Editor.
Now, when someone tries to change the proxy settings in
Internet Explorer, they'll see a message saying that
this has been disabled by the administrator.

Firefox Proxy Settings Disabled
For Firefox, you can accomplish the same thing by making
a tiny change to a file in the browser.jar
archive. Specifically, we commented out most of the
connection.xul file. This disables the
interface to change the proxy settings, as shown in the
screenshot. We've provided this changed file for you so
you
don't need to do it. On your public computers, set
the proxy settings in Firefox as shown earlier, then go
into the chrome folder within Firefox's
installation directory (probably C:\Program
Files\Mozilla Firefox\chrome). Rename the
existing browser.jar to
browser.jar.old, then
download our
modified version of browser.jar, and
save it to that same folder. Now when you start
Firefox, the proxy settings can't be changed. When you
do need to change them, rename the new
browser.jar to browser.jar.new
and rename browser.jar.old back to
browser.jar. This file works
with Firefox 1.5, and will possibly work with later
versions, too.
Of course, as ruled in the Supreme Court decision on CIPA in 2003, we must disable the filter reasonably quickly if an adult patron requests it. Because our wireless service is always automatically filtered, there is not much we can do there, except to offer to let a patron use an unfiltered library terminal instead of their laptop. But with our public access computers, we can make a "key" that will let us turn the filter off and on as often as we like on a per-machine basis, for the adult users only.
We can take any old USB keychain drive (thumb drive, jump drive, memory stick, etc.) and turn it into our "key" by putting a special batch file on it to do all the work. Just keep the key in a safe place so that people can't disable the filter on their own. A plain old floppy disk will work for this, too.
The batch file will change a registry key, telling Internet Explorer to use the filter or not. It will also switch configuration files for Firefox, one setup for the filter, and one not. But before we can create our batch file, we need some additional information first.
First, you'll need to find out the name of the profile
that was randomly generated for you by Firefox. It's in
a normally hidden directory, so to get there, Click on
the Start Menu, then click on "Run…" and type or
paste this into the box before clicking OK, replacing
"YOUR-USER-NAME" with whatever your current user name
is: C:\Documents and Settings\your-user-name\Application Data\Mozilla\Firefox\Profiles

Mozilla Profile Folder
As shown in the picture, you'll see at least one folder in the window that appears, whose name is a jumble of letters and numbers, ending in ".default". Make a note of this directory name, we'll be putting it in our batch file.
Go ahead and double-click on this folder to enter it for the next step. Firefox stores its settings in a file called "prefs.js". We're going to create some additional copies of this file for our batch file to manipulate. Copy "prefs.js" (Select the file, then click on Edit -> Copy; Edit -> Paste). Rename the new file, "Copy of prefs.js", to "prefs-orig.js". Repeat that last step, only this time name the new file "prefs-nofilter.js".
We'll edit this file now to remove our proxy settings from it. Right-click on "prefs-nofilter.js", select "Open With", then choose "Notepad". In Notepad, scroll down until you find these lines
user_pref("network.proxy.http", "your-server-IP-address");
user_pref("network.proxy.http_port", 8081);
user_pref("network.proxy.type", 1);
and delete them. If there are more than three lines containg "network.proxy", just delete all of them. Save and exit the file.
We'll now do the batch file. We've provided this file for you here. Save this file to a USB drive. We'll use Notepad to edit the file (Right-click on it, select "Open With", then choose "Notepad"). Everywhere you see "YOUR-USER-NAME", replace that with the user name you are currently working on. Similarly, everywhere you see "YOUR-PROFILE", put in the profile folder name we found above, including the ".default" part.
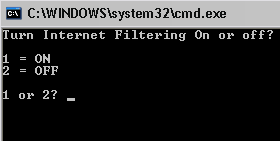
Batch File Running
Now, stick your USB drive in the computer on which you
want to change filtering settings. Go to My Computer
to open the drive, or if Autoplay is enabled your USB
drive will just open up. Double click the
filter.bat file to start the batch file.
You'll see the prompt as shown to disable or enable
the filtering. From there, you can just follow the
instructions on the screen. If either Firefox or
Internet Explorer are running at the time your run
the batch file, they will both be forced to quit. After
the batch file finishes, you can restart your browser
with the new filtering settings in place. Use the key
again to change it back.
Congratulations! You've finished all the hard work. Continue on to see your support options.
Previous Page: Configuring Your Web Content Filter
Next Page: Tech Support Options