
By John C. Rucker (Page 5 of 8)

Squid Logo
Well, before we can actually work on the filter, we need to setup the program that the filter relies on: Squid. Install it by running:
# apt-get install squid
You might get some sort of error message as Squid tries to start for the first time. Don't worry about this; we need to set Squid up properly before it can start. We'll be editing the main Squid configuration file:
# nano /etc/squid/squid.conf
Go down in the file about 700 lines or so until you see
the section labelled "TAG: cache_access_log". (A
shortcut to find this line is to use Nano's search
feature. Type Ctrl + W, then enter the
term you're searching for.) At the bottom of the section,
below where it shows you the example default value,
insert the following line: cache_access_log
none. As you might guess, this disables the log
of what the web pages Squid is processing. By turning
this off we'll improve performance as well as preserve
the privacy of your patrons. With the logging turned on
(the default setting) there would be a record saved on
your server of every web page that everyone going
through the filter requests.
Go down in the file quite a way further until you see
the section "TAG: visible_hostname" (on my system, this
was around line 2154). Below where it reads
"# none", insert the tag followed by the name of your
server, like so: visible_hostname
wifi-server.
Another 100-lines or so below that, find the section "TAG: httpd_accel_host". Below the default example, add the following two lines:
httpd_accel_host virtual
httpd_accel_port 80
A few lines below that, find "TAG:
httpd_accel_with_proxy", and add the following below the
default example: httpd_accel_with_proxy on.
Then, in the very next section, add
httpd_accel_uses_host_header on below the
default example.
Save and exit your file, then initialize the Squid cache by typing:
# /etc/init.d/squid stop
# squid -z
Finally, start Squid up by typing:
# /etc/init.d/squid start
If there were no errors, great! If there were any errors, check your work.

DansGuardian Logo
With Squid out of the way, we can finally get on to the filter, DansGuardian. Well…almost. DansGuardian has one more dependency that we must install, but it requires no configuration. Type the following:
# apt-get install clamav-base
# apt-get install clamav-freshclam
One feature of DansGuardian is the ability to virus scan every single file downloaded by anybody on the network. The packages we just installed are related to that and required, even if you don't want to use the feature (which we won't be).
Now, install DansGuardian by typing:
# apt-get install dansguardian
We've only briefly touched on this before, but we mentioned that you'll be able to use this filter for both patron laptops and your library own computers. To make this solution even more attractive to this end, we're going to discuss how to setup multiple filtering profiles. For our example we'll do two: one suitable for general adult use, and another for young children. This way, you can be more restrictive as your needs dictate on your children's computers, but not overly burden your staff and adult patrons. And if you want more than two profiles, just repeat these instructions as many times as necessary.
First, we're going to rename the DansGuardian program, and then copy it so that we have two, each with different names:
# mv /usr/sbin/dansguardian /usr/sbin/dansguardian1
# cp /usr/sbin/dansguardian1 /usr/sbin/dansguardian2
Next, we'll do something similar with the configuration files:
# mv /etc/dansguardian /etc/dansguardian1
# cp -R /etc/dansguardian1 /etc/dansguardian2
And finally, something similar with the log files:
# mv /var/log/dansguardian /var/log/dansguardian1
# cp -R /var/log/dansguardian1 /var/log/dansguardian2
# chown -R dansguardian:dansguardian /var/log/dansguardian2
Now we can get down to defining what kind of content
we'll allow. The amount of control that DansGuardian
gives you in this regard is truly amazing. If you want
to explore all the possibilities, you should look
through every file in the
/etc/dansguardian1 and
/etc/dansguardian2 directories to see what
you can block. And it's a lot: you can block specific
file extensions and mime-types to prevent music and
movie downloads, Flash and Java applets, games,
chat, zip files, and so much more. The comments in the
files in those directories provide all the
instructions you should need to customize things. And
if you want to customize things further, read up on the
DansGuardian
documentation.
With so many options though, customizing the configurations for your two different profiles can take a long time. There are also a number of little tweaks we need to do to get the two profiles working. The remaining steps on this page will simplify all that for you.
CIPA requires us to filter for pornographic
content, and that's all we should do for our adult
patrons. For our children's computers, though, we
might want to filter more than just porn. That's
why the configuration files we're providing are
for two different filtering levels.
dansguardian1 is set up to a level
appropriate for young children. DansGuardian
operates by assigning weight to particular terms.
Once a threshold is reached, the page is blocked. At
this children's level, the threshold is set low, and
the filter looks for content related to pornography,
profanity, drugs, violence, and intolerance.
The adult profile, dansguardian2 has a
much higher threshold and pays attention only to
content that relates to pornography.
We'll start by having you download the two sets of configuration files, as well as the two startup scripts:
# cd ~
# wget www.branchdistrictlibrary.org/professional/ubuntu_dans_files/dansguardian1.tar.bz2
# wget www.branchdistrictlibrary.org/professional/ubuntu_dans_files/dansguardian2.tar.bz2
# wget www.branchdistrictlibrary.org/professional/ubuntu_dans_files/dansguardian1_script.tar.bz2
# wget www.branchdistrictlibrary.org/professional/ubuntu_dans_files/dansguardian2_script.tar.bz2
Next, we'll unpack the archives:
# tar -xjf dansguardian1.tar.bz2
# tar -xjf dansguardian2.tar.bz2
# tar -xjf dansguardian1_script.tar.bz2
# tar -xjf dansguardian2_script.tar.bz2
Now, we'll copy all these files to their proper locations:
# cp -R dansguardian1 /etc/
# cp -R dansguardian2 /etc/
# cp init.d/dansguardian1 /etc/init.d/
# cp init.d/dansguardian2 /etc/init.d/
Next, we'll unregister the old startup scripts and register our new ones:
# update-rc.d -f clamav-freshclam remove
# update-rc.d -f dansguardian remove
# update-rc.d dansguardian1 defaults 40 20
# update-rc.d dansguardian2 defaults 40 20
Now for the moment of truth: try starting the two filtering profiles:
# /etc/init.d/dansguardian1 start
# /etc/init.d/dansguardian2 start
Any error messages? If so, check your work. If there were no errors, let's test the setup.
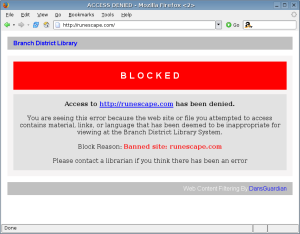
Blocked!
Fire up a laptop on your wireless network and start
your favorite web browser. Try to go to any old page,
like google.com or yahoo.com.
Did it work? Great! Now, try to go to
www.badboys.com, a site blocked in the
bannedsitelist file. Do you see the
"Blocked" banner? Good.
We can also do a couple more things to test our firewall. Try to send a message from an email client like Outlook or Thunderbird. Try to connect to the AOL or Yahoo instant messenger networks. Try to log on to a peer-to-peer network or download a file with BitTorrent. None of these should work. If they do, go back and check your work.
Sometimes a web site may get blocked when it shouldn't
have been, other times something might slip through that
should have been blocked. This is unavoidable, and
happens with commercial filters, too, even if they
don't want to admit it. When this happens, you can
dive into the inner workings of DansGuardian to see
how the term weighting is being applied, or you can
just explicitly block or allow a partiular web page, or
even an entire domain. You do this by simply editing
one of four files in the /etc/dansguardian1
and /etc/dansguardian2 directories with the
Nano editor:
bannedsitelist
bannedurllist
exceptionsitelist
exceptionurllist
The "site" list files cover blocking or allowing whole web sites, and the "URL" list files cover individual pages of a site. For example, if you wanted to block the RuneScape game from your children's computers, you would type:
# nano /etc/dansguardian1/bannedsitelist
You would then add "runescape.com" to the list of sites to block. And, as always, save and exit your file.
Every time you make any changes, you must restart the filter service by running:
# /etc/init.d/dansguardian1 restart
# /etc/init.d/dansguardian2 restart
Editing these four files (eight, really, since we have two sets of configurations) is likely the only thing you'll ever need to do to your server. And even that probably won't need to be done very often. Here at the Branch District Library, we can go months without ever needing to tweak the blocked or exception lists.
One last thing before we go on: let's restart the server and see if everything runs correctly when it comes back up. If you took your monitor off earlier, it would be a good idea to put it back on for this step so you can see any error messages. If the server comes up OK, you can remove the monitor again for good and just connect via SSH from now on. To restart the server type:
# reboot
If you ever need to turn the server off completely,
type "poweroff" instead. As the server boots up, you
should see a
steady stream of "OK" messages, followed by the login
prompt. If you see any "FAILED" messages, you'll need
to note what failed, then check your work for that part.
Now, on to the next step.
Previous Page: Setting Up Your Firewall
Next Page: Client Configuration