
By John C. Rucker (Page 8 of 10)
As a result of the Supreme Court decision on CIPA in 2003, we must disable the filter reasonably quickly if an adult patron requests it. Knowing the IP address of the computer you want to un-block, you can simply temporarily add it to /etc/dansguardian/lists/exceptioniplist. That would work for any computer, whether a patron laptop or a library computer.
For your public access computers, it can be even quicker. We can take any old USB flash drive and turn it into our "key" by putting a Windows batch file on it to do all the work. Just keep the key in a safe place so that people can't disable the filter on their own. A plain old floppy disk will work for this, too.
The batch file will change a registry key, telling Internet Explorer to use the filter or not. It will also switch configuration files for Firefox, one setup for the filter, and one not. We've provided this file for you here. Download it and save to your flash drive.
All that's left to make this work is copying Firefox's preferences file. Click the start menu and choose "Run…". Copy and paste the following into the run box and hit enter:
explorer %APPDATA%\Mozilla\Firefox\Profiles\

Mozilla Profile Folder
As shown in the picture, you'll see at least one folder in the window that appears, whose name is a jumble of letters and numbers, ending in ".default". Go ahead and double-click on this folder to enter it for the next step. Firefox stores its settings in a file called "prefs.js". We're going to create some additional copies of this file for our batch file to manipulate. Copy "prefs.js" (Select the file, then click on Edit -> Copy; Edit -> Paste). Rename the new file, "Copy of prefs.js", to "prefs-orig.js". Repeat that last step, only this time name the new file "prefs-nofilter.js".
We'll edit this file now to remove our proxy settings from it. Right-click on "prefs-nofilter.js", select "Open With", then choose "Notepad". In Notepad, scroll down until you find these lines:
user_pref("network.proxy.http", "your-server-IP-address");
user_pref("network.proxy.http_port", 8080);
user_pref("network.proxy.type", 1);
and delete them. If there are more than three lines containg "network.proxy", just delete all of them. Save and exit the file.
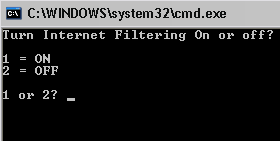
Batch File Running
Now, stick your flash drive in the computer on which you want to change filtering settings. Click on the Start Menu then go to "My Computer" to open the drive, or if autoplay is enabled your flash drive will just open up. Double click the filter.bat file to start the batch file. You'll see the prompt as shown to disable or enable the filtering. From there, you can just follow the instructions on the screen. If either Firefox or Internet Explorer are running at the time your run the batch file, they will both be forced to quit. After the batch file finishes, you can restart your browser with the new filtering settings in place. Use the key again to change it back.
You can make a similar script for any Macintosh or Linux patron computers you might have and save them all to the same flash drive for convenience.
Congratulations! You've finished all the hard work. Continue on to see your support options, if you need them.
Previous Page: Client Configuration
Next Page: Tech Support Options