
By John C. Rucker (Page 7 of 10)
"What?" you might be saying about now, "Client configuration? I thought you said this wouldn't require any configuration on our patron laptops!" Well, that's true. But if you want to use this filter for your staff computers on the other side of the firewall, or for your wired public access computers, you'll need to adjust the appropriate settings. If you don't want to do either of these things, you can ignore this page and go on to the next section.
Revised Network Diagram
Take a look at the revised network diagram at left. We've added another switch or hub to connect the wired public access computers to our web filter server. The instructions below will work for computers on either side of your firewall; that is, for staff or public. Just be sure to use the correct IP address for whichever side of the firewall you're on.
Note: All of these steps need to be performed while logged in to the user account that your staff or patrons will use. If you have multiple login accounts, like one for adult use and one for kids, you'll need to repeat the following steps for each account.
For Internet Explorer, launch it then click on Tools -> Internet Options then click on the Connections tab. Then click on the LAN Settings… button at the bottom.
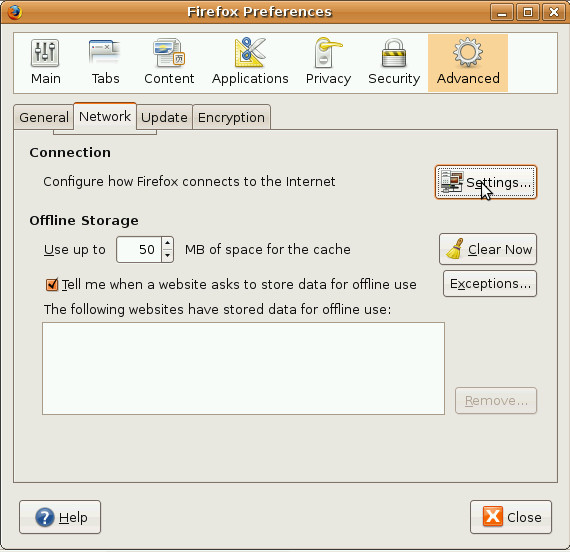
In the window that pops up, check the "Use a proxy server […]" then click the "Advanced" button.
In the "Advanced" window, put the IP address of your server in the "HTTP" field. In the "Port" field put 8080.
Setting up the filter for Firefox is even easier. Click on Tools -> Options to display the options window, then click on the "Advanced" tab. From there, click "Network" then the "Settings" button in the "Connection" section.
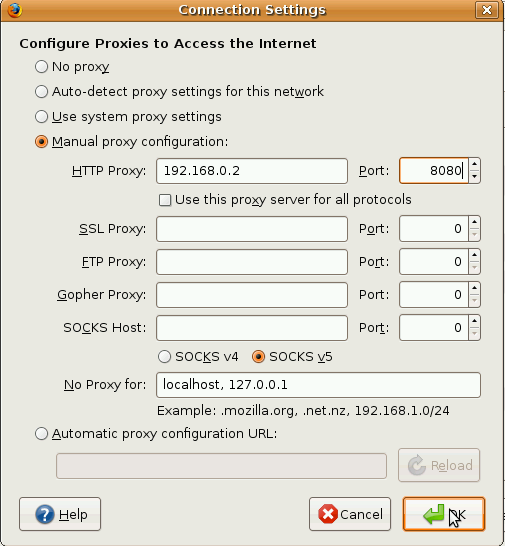
In the "Connection Settings" window, select "Manual proxy configuration" and enter the address of your server in the "HTTP Proxy" field. In the "Port" field put 8080.
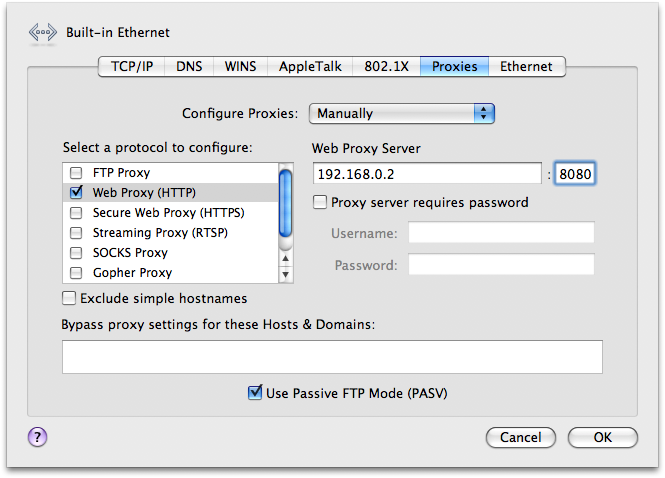
On the Macintosh, instructions for Firefox are the same as above. For Safari, click on the Apple menu, select "System Preferences" then select "Network". In the "Network" window, select the appropriate network adapter, then click on the "Advanced" button. In the Window that opens up, click on the "Proxies" tab then on the dropdown box choose "Manually". Check the "Web Proxy(HTTP)" box, then enter the IP address of your server in the "Web Proxy Server" field. In the "Port" field put 8080.
Of course, one of the problems with using the proxy server settings we just set above is that anybody else with this knowledge can disable the filter as easily as you put it on. Fortunately, there are some ways to deal with this, too.

Group Policy Editor
Since you can password-protect the proxy settings on a Macintosh right from the System Preferences, we'll focus on the Windows platform. With Windows 2000 and newer, you can use the Group Policy Editor to prevent people from changing the proxy settings in Internet Explorer, and you need to change only one policy to do so. To start the editor, click the Start Menu, then select "Run…". Type gpedit.msc, then click OK, and the Group Policy Editor window will appear. On the tree on the left-hand side, navigate down to Local Computer Policy -> User Configuration -> Administrative Templates -> Windows Components -> Internet Explorer, then find the policy, "Disable changing proxy settings". Double-click on this to edit it, enable the policy, then click "OK". You can close the Group Policy Editor. Now, when someone tries to change the proxy settings in Internet Explorer, they'll see a message saying that this has been disabled by the administrator.
For Firefox, you can accomplish the same thing by making a tiny change to a file in the browser.jar archive. Specifically, we commented out most of the a small section of advanced.xul file. This disables the interface to change the proxy settings. We've provided this changed browser.jar for you so you don't need to do it. On your public computers, set the proxy settings in Firefox as shown earlier, then go into the chrome folder within Firefox's installation directory (probably C:\Program Files\Mozilla Firefox\chrome). Rename the existing browser.jar to browser.jar.old, then download our modified version of browser.jar, and save it to that same folder. Now when you start Firefox, the proxy settings can't be changed. When you do need to change them, rename the browser.jar you just downloaded to browser.jar.new and rename browser.jar.old back to just browser.jar. This browser.jar works with Firefox 3.5.4, and will possibly work with later versions, too. It will also work on Macintosh computers.
Previous Page: Configuring DansGuardian
Next Page: Disabling the Filter as Needed