
By John C. Rucker (Page 4 of 10)
At this point, if you haven't done so already, you probably want to be viewing this tutorial in Firefox on the server you are customizing. That way you can copy and paste the changes from the tutorial directly to your server.
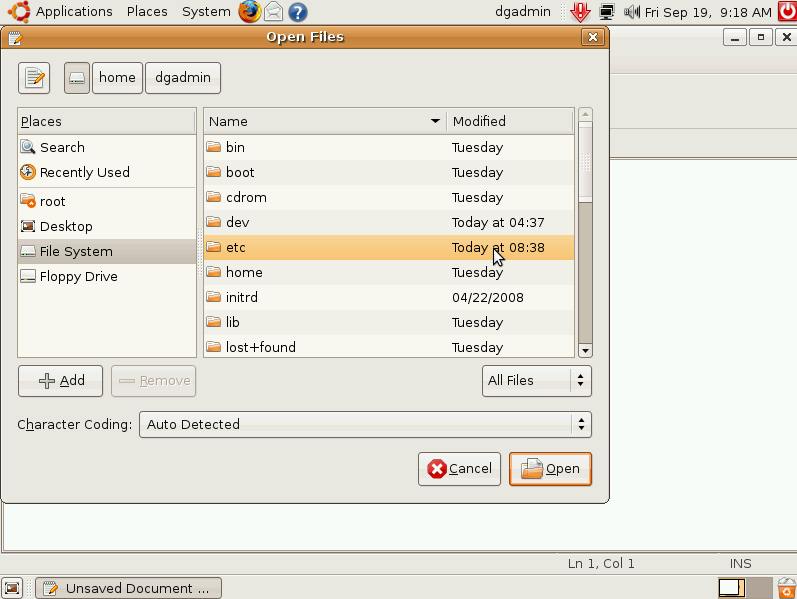
We'll start by configuring the DHCP server. The DHCP server is the part that will send patron laptops all the information they need to get online. Double-click the "gedit (as admin)" icon you created in the last step and authenticate. Click the "Open" button on the tool bar. On the left panel of the Open Files dialog box, click on "File System". Then on the right panel, double-click on "etc". /etc is the folder where all the configuration files we'll be editing live, so this is the path you'll take in all the upcoming steps.
(A quick word on Unix filesystem paths: directories or folders are separated by a regular slash /, whereas Windows uses a backslash \. The first slash in a path indicates the root directory of the hard drive. So / is similar to C:\ on a Windows computer, and /etc is one folder down from the root of the hard drive.)
First you need to edit a file to let the server know on which network interface to listen for incoming DHCP requests. We're currently in the /etc folder; navigate further to the default folder, and open the dhcp3-server file. The full path to get to this file then is /etc/default/dhcp3-server, and this is how I'll direct you to open files for the rest of this tutorial.
Change INTERFACES="" to be INTERFACES="eth1". Save your file, then you can close it by clicking the little "X" on top of the document tab. Don't close the gedit window itself, since we'll be editing several more files yet.
Next open /etc/dhcp3/dhcpd.conf. You can click on Edit -> Select All then hit the delete key on your keyboard to clear the file. Now edit the file so that it looks like the example below, changing parameters as necessary to fit your network, especially your DNS servers.
authoritative;
default-lease-time 3600;
max-lease-time 3600;
option routers 192.168.1.1;
option domain-name-servers your-dns-server1,your-dns-server2;

subnet 192.168.0.0 netmask 255.255.255.0 {
}

subnet 192.168.1.0 netmask 255.255.255.0 {
    range 192.168.1.11 192.168.1.254;
}
Save and close the file.

Shorewall Logo
The firewall is arguably the most important part of this entire project. It is what is going to keep all of those patron laptops—and potentially virus-laden ones at that!—safely away from your staff network where you conduct your business and store sensitive personal data. The firewall will also let you set rules to limit abuse of your service. Finally, the firewall does the work of transparently routing the web traffic from the visiting laptops through the content filter. This means that everyone who brings a laptop to your library will be filtered without you lifting a finger.
Linux comes with a built-in firewall system, iptables, but it can be a bit tricky. To make it less so, we'll use a frontend to iptables called Shoreline Firewall, or Shorewall for short. We need to edit a number of files to get Shorewall working. First open /etc/default/shorewall and change startup=0 to startup=1, then save and close the file. This will enable the automatic running of Shorewall.
Next, we need to copy Shorewall's example configuration files to our working location. We'll use the terminal to do this, and it will be one of the very few times we'll need to use the command line. Start the terminal by going to the menu bar at the top of the screen, then click on Applications -> Accessories -> Terminal. Type or copy the line below into the terminal, then hit enter. Enter your password then hit enter again.
sudo cp /usr/share/doc/shorewall-common/default-config/* /etc/shorewall/
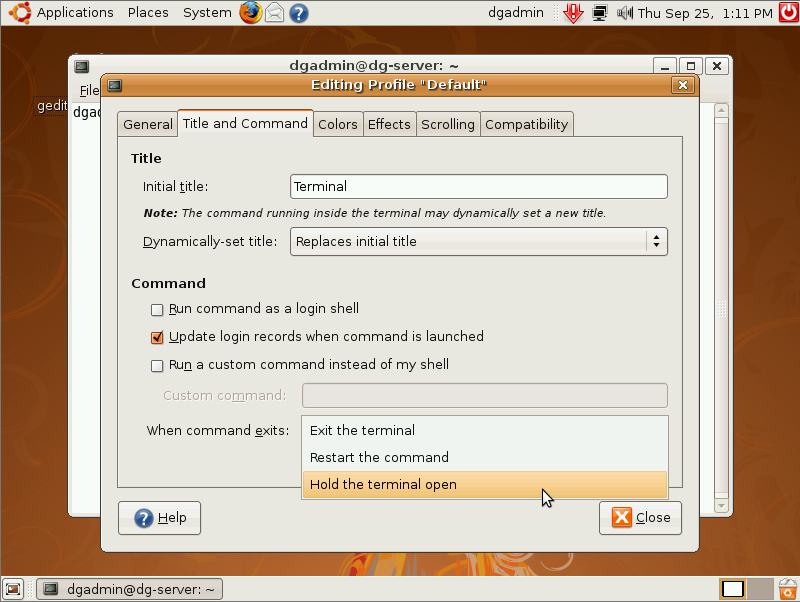
You'll get no confirmation that it worked. Unless you get an error message, don't worry—it worked. While the terminal is open, let's change one setting on it which will help us later when we need to restart various services. Click on the Edit menu on the terminal window, then choose Current Profile…. On the window that pops up, click on the "Title and Command" tab. At the bottom of the window, set "When command exits: " to "Hold the terminal open". You may now close the terminal.
Now we'll need to edit some of the Shorewall configuration files. First, we'll make a single change to the main configuration file: /etc/shorewall/shorewall.conf. Find the line that reads IP_FORWARDING=Keep and change that to IP_FORWARDING=On. Save and close this file.
Next, we'll edit /etc/shorewall/interfaces. Go all the way to the bottom of the file, then add two lines before the last line so that the end of your file looks like this:
#ZONE   INTERFACE   BROADCAST   OPTIONS

net     eth0        detect
loc     eth1        detect      dhcp

#LAST LINE -- ADD YOUR ENTRIES BEFORE THIS ONE -- DO NOT REMOVE
This tells Shorewall which network cards correspond to which zones in our firewall schema, and on which one we're serving DHCP information. loc represents any computer behind our firewall: "local" traffic—all the patron laptops, for example. net refers to any computer in front of the firewall: your staff computers, and any computers on the larger Internet. You can now save and close this file.
Now edit /etc/shorewall/masq so that the end of the file looks like this:
#INTERFACE    SUBNET    ADDRESS    PROTO    PORT(S)    IPSEC

eth0          eth1
eth0          192.168.0.0/24

#LAST LINE -- ADD YOUR ENTRIES ABOVE THIS LINE -- DO NOT REMOVE
This lets the firewall know that it can process traffic comming into either of your network cards. This will let you use your server as a filter for your staff workstations, too. Save and close the file.
Next, we'll edit the /etc/shorewall/policy file to setup the default actions for the firewall. Edit the end of the file to look like this:
#SOURCE     DEST        POLICY      LOG     LIMIT:BURST
#                       LEVEL

loc         all         REJECT
fw          all         ACCEPT
net         all         DROP
all         all         REJECT

#LAST LINE -- DO NOT REMOVE
This file is processed if the traffic going through the firewall doesn't match any of the explicit rules that we'll set later; in other words, the policy provides the default rules. In a nutshell, the above policies mean that all traffic not explicity allowed is blocked, and the server can talk to any other computer. Save and close the file.
Next, we'll edit the /etc/shorewall/rules file to setup the exceptions to the above policies. These exceptions are critical if you actually want your public Internet to be useful. One the second-to-last line, you'll see "SECTION NEW". Delete that then add the lines below in its place. ("#" signifies that the line is a comment which Shorewall will ignore.)
# All pinging the web filter
ACCEPT      loc        net        icmp

# Allow DNS requests
ACCEPT      loc        net        tcp     53
ACCEPT      loc        net        udp     53

# Allow POP3 email
ACCEPT      loc        net        tcp     110

# Allow NTP (Network Time Protocol)
ACCEPT      loc        net        udp     123

# Allow IMAP email
ACCEPT      loc        net        tcp     143

# Allow secure web sites
ACCEPT      loc        net        tcp     443

# Allow DHCP requests
ACCEPT      loc        fw         tcp     546,547

# Allow Secure IMAP email
ACCEPT      loc        net        tcp    993

# Allow Secure POP3 email
ACCEPT      loc        net        tcp    995

# Allow both sides of the firewall to access the filter
ACCEPT      net       fw          tcp    8080

# Route all HTTP traffic from patron laptops to the passive filter
REDIRECT    loc        8080       tcp    80,8000

#LAST LINE -- ADD YOUR ENTRIES BEFORE THIS ONE -- DO NOT REMOVE
Most of that should be clear enough from the inline comments, but let's break it down anyway. The first few rules will allow normal and secure web pages. They will also allow people to check their email with a program like Outlook or Thunderbird, but not send mail. Checking and sending mail via web-based mail like Yahoo! or Hotmail is unaffected. We block outgoing SMTP mail so that people won't use our free Internet access to send spam. We also allow access to the web content filter from either the wired or wireless side of your server. The last rule is where all the magic happens: all non-secure web page traffic to from patron laptops will be silently redirected to port 8080 on the server. This is the port that DansGuardian will be listening on. Save and close this file.
There are other exceptions you might want to make if you deem them appropriate: VPN access for business travelers or instant messenger services, among other things. For these, you'll need to find out what protocols and ports to make exceptions for. Look at lists of common ports and the Shorewall documentation for more information.
The last file to edit is /etc/shorewall/zones. Go to the end of the file and edit it to look like this:
#ZONE   TYPE            OPTIONS         IN                      OUT
#                                       OPTIONS                 OPTIONS

fw      firewall
net     ipv4
loc     ipv4

#LAST LINE - ADD YOUR ENTRIES ABOVE THIS ONE - DO NOT REMOVE
Save and close the file. With that finished, the next step will be getting DansGuardian working.
Previous Page: Installing and Configuring Ubuntu Hardy
Next Page: Configuring Squid