No. 9 Envelope w/windows
Switching from your old automation system to Michigan Evergreen brings a host of changes, some more convenient, some maybe less so. But handling overdue notices is about as simple as it gets once the basics are in place. Whether you are a small library with not much in the way of an IT department, or a larger library with your own dedicated servers, a solution can be put together that will fit your needs.
The output of many of the Evergreen reports can be a bit sparse, and for the purposes of stats and simple data reports this is fine. Overdue reports are a special case, though, since you'll probably want to send your patron a nicely-formatted notice, not just some spreadsheet. This howto will detail how to generate notices suitable for sending by regular mail. No special software or knowledge is needed to make it all work. You will simply need a web browser and a text editor like Notepad.
The overdue reports will be sent to you as an XML file. A plain text file with a .xml extension, by itself this file is not much more useful than a spreadsheet, but it sure has potential!
No. 9 Envelope w/windows
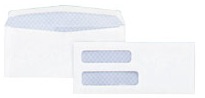
If you know anything about how web pages are made, you might know that you can use something called a cascading style sheet (CSS) to change the look of your basic web page document. We can do something very similar to turn our XML file into a professional-looking notice that you can fold to fit a standard number 9 envelope with address windows.
Here's an example file, overdues.xml:
01<?xml version='1.0' encoding='UTF-8'?>
02<?xml-stylesheet type="text/xsl" href="overdues.xsl"?>
03<file type="notice" date="8/21/2008" time="5:5:7">
04 <agency name="MLC">
05  <notice type='overdue' count='14day'>
06   <patron>
07    <id type="barcode">12345678901234</id>
08    <fullname>Susie Derkins</fullname>
09    <street1>10 E. Main St.</street1>
10    <city_state_zip>Chagrin Falls, OH 44022</city_state_zip>
11    <sys_id>1783284</sys_id>
12   </patron>
13   <library>
14    <libname>Central Branch</libname>
15    <libphone>555-123-1234</libphone>
16    <libstreet1>221 N. Broadway St.</libstreet1>
17    <libcity_state_zip>Chagrin Falls, OH 44022</libcity_state_zip>
18   </library>
19   <item>
20    <title>Tactics in Snowball Fighting</title>
21    <author>Kose, Bella.</author>
22    <duedate>7/21/2008</duedate>
23    <callno>J 363.325 KOS</callno>
24    <location>Juvenile Non-Fiction</location>
25    <barcode>43210987654321</barcode>
26    <circ_id>271123367</circ_id>
27    <check_out>7/10/2008</check_out>
28    <item_price>27.00</item_price>
29    <fine>1.00</fine>
30   </item>
31  </notice>
32 </agency>
33</file>
First thing's first: you need to set up a delivery method for your overdues file. Without the overdues XML file, you won't be able to go any further. You have a couple of options here. If you have a server of your own, you can coordinate with the Michigan Evergreen systems staff to have the overdues file copied to your machine daily. Then your library staff could just go to a password-protected page on your server to view and print the overdues. Or you could have the overdues file emailed to the account of your choice. For the purposes of this howto, we'll assume the latter. The remainder of the instructions would work for either method.
The real magic comes not from the XML file, but from how we'll manipulate it. Look at line 2 in the example above. That is a reference to an XSL file, an XML transformation style sheet. Thanks to the XSL file, what you'll see on your screen is a standard HTML web page, instead of the unformatted XML file. In this example, as long as overdues.xsl is in the same folder as overdues.xml, everything will work fine. If you have a server and have Michigan Evergreen send the overdues directly to it, make sure the Michigan Evergreen systems staff know the full URL of your style sheet to insert it in the XML file before they send it your way.
The XSL file itself relies on a couple of standard CSS files that will also need to be in the same location as the XSL and XML files in order to work. And if you want to print notices with barcodes on them for the convenience of your staff, you will need to download and install the Free 3 of 9 barcode font on any machine that will print the notices. (You might also need to set your barcode readers to decode the 3 of 9 symbology if scanning these barcoodes does not work for you. See the manual that came with your scanner for that.)
With all of those pieces in place, you'll simply open up the XML file in your web browser. The browser will automatically use the style sheets to transform the overdues.xml document into printable notices. Let's go over the setup procedure now step by step.
Start by downloading the sample files that we'll edit to suit your library. Right-click on each of the links below and choose "Save As..." to download them, or click here for a zip file containing all the files. (If you're using Internet Explorer, it will try to rename the .xsl file to a .xml file. Just type in the filename box and change it back.) Save all the files to the same folder where you'll save the real overdues.xml file when it's emailed to you.
A description of what the XSL file will do is needed at this point. The print output will have one overdue notice per page, sorted by library branch and formatted to fit a no. 9 envelope with address windows. A return address that you'll supply in the XSL file will be displayed in the return address location, or you can use the return address of the library branch where the item is overdue.
In the example here, there are 3 notice types, all based on how things are done at Branch District Library. We have a first notice generated at 14 days overdue, a final notice at 28 days overdue, then a bill generated on items that are 45 days overdue. On the bills, the fine totals and book cost totals are calculated, along with the calendar days overdue (does not take into account days you are closed). If you do things differently, no problem; you'll customize everything to fit your own needs.
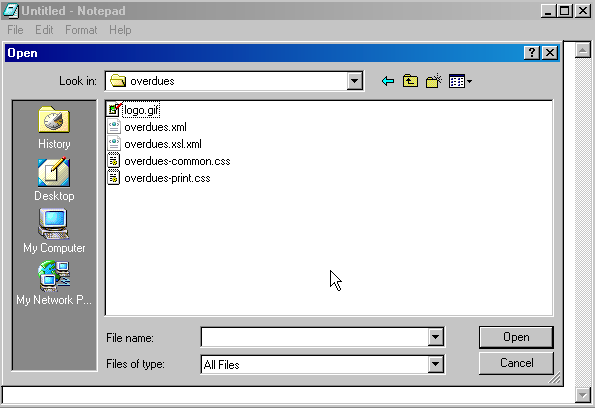
Notepad, Showing all files
Let's start customizing now. Open up overdues.xsl in Notepad, or your favorite text editor. (Note: full-featured word processors like Microsoft Word can mangle plain text files like this. You should not use word processors to edit this file.) To open this file, you'll probably need to launch Notepad first, then click on the "File" menu and select "Open…". At the bottom of the file open window, change the "Files of Type" filter to "All Files". Now navigate to where you saved your files and open overdues.xsl. Don't worry if none of what you see makes any sense to you, it's really easier than it looks. It is helpful to know that any text between <!-- and --> is a comment. That means the browser will ignore anything between these delimiters. This is handy for putting instructions into the document, as well as explanations of what is happening.
The top part of overdues.xsl has several variables that you should edit to match the information for your library. For now, leave the "notice*_count" variables alone, so that you can make this example work. But once you have set up the frequency of the automated overdue reports with the Michigan Evergreen systems staff, come back and change these to your number of days. The comments in this part of the file will guide you on how to make the edits. When you are finished editing the file, save it then open up the sample overdues.xml file in your web browser. (If .xml files are not set to be opened by your web browser by default, you may need to first launch your web browser, then click on the "File" menu and choose "Open File", then navigate to—and open—your file.) With the exception of the fake branch and patron information, what you see should now look like what you want for your library.
As of this writing there is an irritating little bug in Firefox that prevents most graphics from being printed on pages 2->n of an XML document transformed by an XSL style sheet. In my experiments, SVG graphics would print as expected, provided no float attributes were set in the CSS for the <div> elements containing the graphic. So to get the library address to appear next to the logo, we have to use relative positioning on the <div> containing the address. Which is what you'll see if you look at the code presented here.
If you don't already have an SVG graphic of your logo, you can make one pretty quickly using the free program, Inkscape, using the "Trace Bitmap" function under the "Path" menu. Assuming your logo is not overly complex, of course, this should take just a couple of minutes. Here's a tutorial on how to do it. There are many other programs out there than can make SVG images if Inkscape is not your thing.
So, your options are:
overdues.xsl, then edit overdues-common.css so that the return address is in the right spot. (Detailed instructions for this in the comments in overdues.xsl.)overdues-common.css.
Page Setup in Internet Explorer
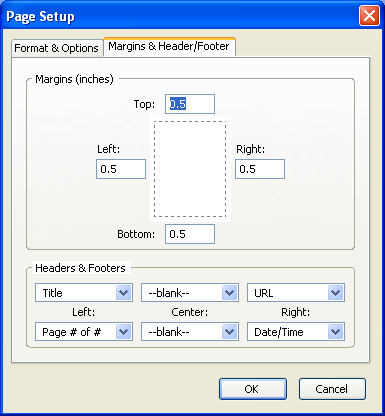
All that's left is printing the notices. Printing will work best in Firefox and Safari, but Internet Explorer (7 and above) will work, too. Whichever browser you use, you'll need to turn off printing of headers and footers for the most professional look. If you don't, you'll have the date, URL, page title, etc., on the tops and bottoms of the pages, same as with any other web page. For Macintosh users, you can turn these off right on the print dialog. Windows users will need to click on the "File" menu, then choose "Page Setup". In Internet Explorer, remove all text from the header and footer lines. In Firefox, set all the drop-down choice boxes to "--blank--".
Page Setup in Firefox
While you're on the page setup screen, change the margins to the smallest your printer will support. 0.25 to 0.5 inches will probably work fine. Now print out your customized examples. The fold line is directly below the line that reads "Borrower ID: […]"
The date at the top of the notices will be the date that you printed them. There will also be a little note at the bottom of the list of overdue books stating the date the notices were originally generated on and the page number: "(Generated on 8/22/2008; 2/3)". The real overdues file sent to you by the Michigan Evergreen systems staff will have the generated date as part of the file name. That way, you can easily find the file and reprint a single notice if you need to.
If you are experienced in web design, feel free to edit any and all aspects of the files used in this example. There's really no limit to what you can do. Here's a PDF of how BDL's customizations look.
For further reading on the technologies and languages used in this overdues example, check out some of the following links.