
By John C. Rucker (Page 3 of 8)

Linux for Libraries!
Linux is an obvious choice for libraries and librarians: it's all about Freedom, it's stable and secure, it can do most anything you could ever want, and it costs nothing. There are dozens of PC operating systems based on Linux that we could choose. You might have even heard of some of them: Red Hat, SUSE, Debian, Mandriva, etc. They are all fine operating systems and any of them would work for this project.
Though it's relatively new on the Linux scene, I've chosen Ubuntu because of its ease of use, strong community support, and strong foundation support. If you don't have a high-speed Internet connection to download Ubuntu, they'll even send you a copy for free.
Ubuntu has made waves in the last year or so by offering a well-polished, easy to use version of Linux aimed at home desktop users. Ubuntu can also make a fine, secure server, however. And the latest release, 6.06 LTS, will be supported for five years.
First we need to get the software. Ubuntu comes in two flavors: regular and server. We want the server version. To download it, choose a mirror site closest to you. Once at the actual download page, scroll down to the "Server Install CD" section. You'll want the first choice: "PC (Intel x86) server install CD", unless you know you have a different type of computer. Click the link and the download will begin. You are downloading an ISO file. If you've not done this before, you should know that you shouldn't just burn the ISO file to a CD. You need to use a program that understands ISO files to burn it. On a Macintosh or Linux PC, this is built-in. On Windows, you'll need to open the ISO file in the software that might have come with your computer or CD burner, like Nero, Easy CD Creator, or use the freely downloadable CDBurnerXP Pro.
Welcome to Ubuntu!
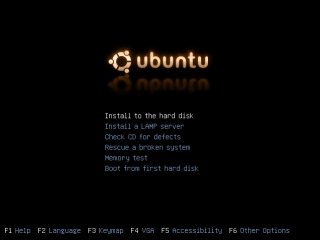
Once you have burned the disc, turn your server on, pop the disc in, then hit the reset button. When the server restarts, it should boot from the CD, and you should see on the screen that is shown in the screenshot. If not, you may need to check your BIOS settings to allow your computer to boot from the CD drive.
Once you've booted up, make sure the first line is highlighted, "Install to the hard disk", and press enter. The remainder of the installation is text-based, but don't let that discourage you! It's still quite user friendly. As the directions at the bottom of the screen show, you use the arrow keys, tab, space bar, and enter to navigate and choose options.
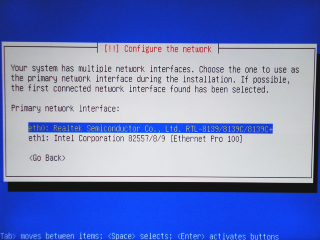
Multiple Network Cards
The next steps are pretty straightforward: choose your
language, location, and keyboard layout. Then the
installer will inform you that it has found multiple
network cards and ask you to choose one of them to
be your primary network card. Choose
eth0 as your primary interface. Next, the
installer will inform you that it is
"Configuring the network with DHCP". Go ahead and hit
cancel to stop this process.
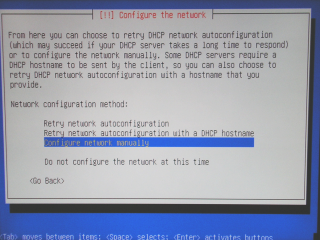
Manual Network Configuration
If you already have a DHCP sytem working at your library, the settings would have been applied automatically (and we'd just need to change them later, since a server needs a static address). After cancelling, you will then need to fill in all the networking details. Use the following information as a guide, but if your network setup is different, be sure to use the appropriate values.
Start ->
                Run
, and type cmd then hit
enter. In the command shell that appears, type
ipconfig /all and hit enter.
ipconfig /all
mentioned above.
You may have noticed that, even though we have two network cards in our server, we only filled in IP address information once. We'll take care of the second card later.
Next, you'll be asked to give your server a host name.
This can be whatever you want, so long as it's unique
on your network. For our example, we'll use
wifi-server.
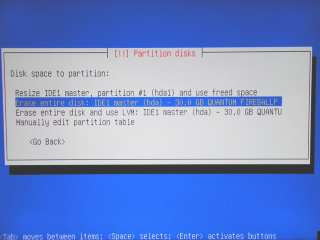
Disk Partitioning
After that comes the disc partitioning. Unless you know what you're doing and have a custom partitioning scheme, just choose the option, "Erase Entire Disk". The installer will ask you to confirm your decision before you can continue.
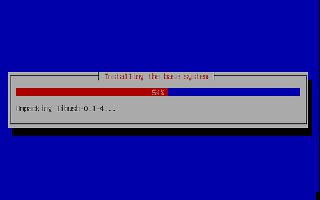
Installing the System
Finally, you will need to configure the timezone, clock, then create a user name that you'll use to log on to the computer. And with that the installer will start copying files, as shown in the screenshot.
When the installation is finished, remove the CD, then restart the server. You'll be presented with a login prompt that looks something like this:
wifi-server login:
Yes, this is a text-based interface, but don't panic. Not having a graphical system lets you use much older hardware for your server, if you want to, and it keeps your server speedy. Besides, you probably used a DOS machine back in the day before Windows, right? It will all come back to you, I'm sure. And if you have no previous experience, don't sweat it. We'll show you step-by-step how to do everything.
Log in with the name and password that you set up during the installation. Once you've done this, the prompt will look something like this:
your-user-name@wifi-server:~$
The first thing we're going to do now that you're logged
in is enable the root user. "Huh?" you
say.
Here's a little bit of background information first.
Unlike a new Windows installation, the account you do
most of your work in on a Linux PC is not an
administrator; you are just an ordinary user. If you
want to do anything that affects more than just your
private user space on a Linux PC, you have to do it as
the adminstrator, usually called the root
account.
Ubuntu began as a system targeted towards desktop users,
so they tried to make things easier for you. They
disable root by default and just require
you to enter your user password when you need to perform
administrative tasks. Only one password to remember,
great! But that's also only one password that needs to
be compromised to gain control of your server. By
enabling the root account, we'll make your
system more difficult to break into. If you don't like
the idea of needing to remember one more password,
though, you can skip this step. Our server won't be
directly connected to the Internet, so the danger will
come only from your patrons.
To enable root, type:
$ sudo passwd root
It will ask for a password. This password is your user
password. Next it will say, "Enter new UNIX password".
This is where you will give root a
password. Now, we'll actually log in
as this newly-enabled root user by typing:
$ su
and entering the password you just set. Your command prompt will now look something like this:
root@wifi-server:/home/your-user-name#
Whenever you are going to work on your server, you will
need to log in first as your user, then as
root.
Before we go any further, let's take a quick moment to go over some of the most basic Linux commands that we'll be using. Some are similar to DOS commands, if you are already familiary with those.
ls - gives you a directory
listing. This is
the same as the DOS command dir.
cd - same as in DOS, this is the
command to change
directories.
cp - this is the command to
copy a file or
directory.
mv - this command
moves a file or
directory to a new location. You can use this
command to rename something.
touch - this command creates an empty
file with the filename that you give the command.
For any command, you can type command
--help for brief instructions on how it works.
We will now disable direct root access at
the computer. Do this by typing:
# mv /etc/securetty /etc/securetty.bak
# touch /etc/securetty
Many commands, such as the two above and others later on, provide no feedback to let you know they did their job. Don't worry! If there are no error messages, and the next line after running your commands is the blank prompt, everything is fine.
We'll now disable the ability for the user account you created to temporarily elevate to the administrator level by entering the user password:
# mv /etc/sudoers /etc/sudoers.bak
Here's an optional step: if you don't want to be told to regularly change your passwords on the server, run the commands below. If you don't mind making new passwords every so often (changing passwords is a good idea for security), skip this step.
# passwd -x -1 root
# passwd -x -1 your-user-name
Before we can go any further, we need to make sure that your network configuration is setup properly, including the second network card. The first card should have already been setup during the installation process.
Run the command
# ifconfig
to see the information about your already-configured interface. The first lines will look something like this:
eth0    Link encap:Ethernet HWaddr 0C:38:4D:51:5A:00
        inet addr:192.168.0.2 Bcast:192.168.0.255 Mask:255.255.255.0
Linux names the primary Ethernet interface
eth0, the second eth1, and so
on. The interface that was configured during the
installation process was eth0, the
interface connected to your main network.
HWaddr is the MAC address of
eth0. Is this the same as the MAC address
you wrote down earlier? If so, then the server is using
your secondary network card as the primary interface.
If not, then the original network card in your server is
the primary interface. Knowing which is which now, you
can make sure that your Ethernet cables are going from
the correct interface to the correct network or wireless
access point. You might want to go ahead and put a
label on the back of your server case, too, indicating
which is eth0 and which is
eth1, for future reference.
Now, we need to actually tell the server what to do with
the eth1 interface. Run the command
# nano /etc/network/interfaces
"Nano" is like the old "edit" text editor in DOS, if you ever used that. Find the section under the comment "# The primary network interface." Here's all the information that was setup at installation time. If the first line below that comment reads "iface eth0 inet dhcp", change "dhcp" to "static". Also, make note of the address because you'll need it when we start remotely administering the server in a few steps.
There is no entry for the second network card, so we'll need to type that all in. Follow the pattern for the primary interface to create an entry for your secondary interface. Your finished file should look something like this:
# This file describes the network interfaces available on your system
# and how to activate them. For more information, see interfaces(5).

# The loopback network interface
auto lo
iface lo inet loopback

# The primary network interface
auto eth0
iface eth0 inet static
    address 192.168.0.2
    netmask 255.255.255.0
    network 192.168.0.0
    broadcast 192.168.0.255
    gateway 192.168.0.1
    # dns-* options are implemented by the resolvconf package, if installed
    dns-nameservers 4.2.2.1

# The secondary network interface
auto eth1
iface eth1 inet static
    address 192.168.1.1
    netmask 255.255.255.0
    network 192.168.1.0
    broadcast 192.168.1.255
    gateway 192.168.0.1
    dns-nameservers 4.2.2.1
Note that we left the gateway and DNS information the
same for both entries, but changed the other items as
appropriate. Ctrl + O will save your file,
then do Ctrl + X to exit Nano. Now run the
following command to restart the networking system:
# /etc/init.d/networking restart
Don't worry if you get a message at this point that says
something like "Failed to bring up eth1". This seems to
happen sometimes, but we can prove that everything is
OK by running the ifconfig command again.
This time there will be a section for eth1,
and on the third or fourth line, you'll see "UP". This
means the interface is active.
So, you now have your network cards configured and connected to the right places. Make sure your wireless access point is turned on and connected where it needs to be. We'll make sure the server sees your access point by pinging it:
# ping -c 4 192.168.1.2
If you don't get a response back, check your work. Also try to ping a site on the Internet, like Google:
# ping -c 4 www.google.com
If those commands don't work, you might have the cables going to the wrong network cards; switch them.
Once that is done, we'll make sure that your server is as up-to-date as it can be and we'll install some software. Some of the software we need isn't accessible to your server by default, so we'll have to enable it. We'll do this, as with nearly every configuration process on a Linux server, by editing a simple text file. Start by typing:
# nano /etc/apt/sources.list
This will open up the file sources.list
for editing in the Nano text editor. First, add a "#"
in front of the first line that reads "deb cdrom
[…]". This symbol turns the line it's
in front of into a comment that the computer will
ignore. Specifically, in this case adding the comment
sign will keep the computer from asking you to
pop in the CD when we install software. Next, we're
going to remove a few comment signs so we can access all
the other software we need from the Internet. Delete
the comment sign (#) in front of the lines that read:
deb http://us.archive.ubuntu.com/ubuntu
            dapper universe
deb-src http://us.archive.ubuntu.com/ubuntu
            dapper universe
Do the same for these lines:
deb http://security.ubuntu.com/ubuntu
            dapper-security universe
deb-src http://security.archive.ubuntu.com/ubuntu
            dapper-security universe
Save and exit your file.
Next, we'll make sure your server is fully updated by typing:
# apt-get update
# apt-get upgrade
You'll want to periodically run those two commands to keep your server up to date. Since this server won't be directly on the Internet, it's not critical, but it's still a good idea.
Now, we'll install NTP and OpenSSH. NTP will keep your computer's clock set correctly. OpenSSH will allow you to log in to your server from another computer on your network with a SSH client like PuTTY.
# apt-get install ntp-simple
We'll now edit the ntpd configuration file so that we are using the NTP server pool.
# nano /etc/ntp.conf
Find the line that reads "#server pool.ntp.org" and
delete the "#" to enable the pool. Exit and save the file. (For
more information on further tweaking NTP, please
look
here.) Now, install ssh:
# apt-get install openssh-server
Just as we disabled direct root logins
at the server earlier, we're going to disable direct
root logins via SSH as well.
# nano /etc/ssh/sshd_config
Find the line that reads "PermitRootLogin
Yes" and change "Yes" to "No". Exit and save the
file. Type the following to restart the SSH service:
# /etc/init.d/ssh restart
Now, from another computer, try to log in via PuTTY or
your favorite SSH client. If you don't have an SSH
client installed, you'll need to get one. You can
download
PuTTY here. When you run PuTTY, you have to put in
an IP address to connect to. Remember the IP addresses
for your two network cards that we set up earlier?
Since you're probably running PuTTY from another library
staff computer, you'll want to use the IP address for
eth0.
Using PuTTY, first try logging in as
the root user. This shouldn't work. If it
did, go back a few steps and check your work. Close the
PuTTY window, then try logging in as the user that you
created. This one should work. Once logged in, run the
su command again to elevate yourself to
root.
Back on your server, type exit to exit your
root sessions, then do it again to exit
your normal user session. You'll be back to the login
prompt from the very beginning. This leaves your server
secured so nobody can modify things if they don't know
your login information. With SSH up and
running, you can even remove the monitor and
keyboard from your server, if you want to, and access it
from any other computer on the network. A plus for the
rest of this tutorial is that by logging in with SSH,
you'll now be able to use copy and paste for all the
commands, instead of typing everything out like you've
done so far. In your web browser just highlight each
line of the commands individually then paste them into
your SSH session. In PuTTY, you do this by clicking the
right mouse button. Go ahead and log in via SSH now.
There is one more step before we move on to the firewall: we must set up our DHCP server for the public network. You might already have a DHCP server running on your main network. If so, don't worry, what we're about to do will affect only our public network and won't interfere with any existing DHCP server. To install the server, type
# apt-get install dhcpd
First, you need to edit a file to let the server know on which interface to listen for DHCP requests:
# nano /etc/default/dhcp
Change INTERFACES="" to be
INTERFACES="eth1". Save and exit your
file, then type the following to edit the configuration
file:
# nano /etc/dhcpd.conf
Edit your file so that it looks like the example below:
authoritative;
default-lease-time 43200;
max-lease-time 43200;
option routers 192.168.1.1;
option domain-name-servers your-dns-server1,your-dns-server2;

subnet 192.168.0.0 netmask 255.255.255.0 {
}

subnet 192.168.1.0 netmask 255.255.255.0 {
    range 192.168.1.100 192.168.1.200;
}
Save and exit the file, then restart the DHCP service:
# /etc/init.d/dhcp restart
If there were no error messages, we can now move on to configuring the firewall rules.
Previous Page: Hardware Configuration
Next Page: Setting Up Your Firewall